Top 5 free digital tools for travel blogging

travel blogging tools

I celebrated my blog’s 1 year birthday early this month. In terms of travel blogging, I’m practically an infant. But I hope to be able to share some of my experience with you.

Today, I will tell you which are my Top 5 favorite free tools for travel blogging. The tools can be adapted to other types of blogging as well.

Since I’m too miserly to buy software for blogging, I choose to use free (not pirated) software for all my work on YQ Travelling.

I’m blogging on the WordPress.com platform so some of the tools might not work for you (eg #5).

Here are the Top 5 free digital tools I use:

  1. Windows Live Writer
  2. Dropbox
  3. Picasa
  4. Evernote
  5. WordPress.com
  6. (Extra) LibreOffice writer

No. 1: Windows Live Writer

Windows Live Writer
Working on a draft of this post in Windows Live Writer

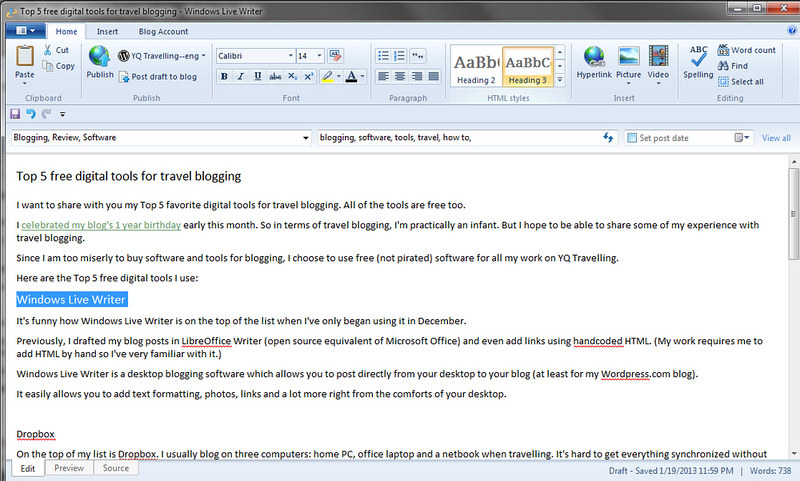
It’s funny how Windows Live Writer is on the top of the list when I’ve only began using it in December. Windows Live Writer is a desktop blogging software which allows you to easily post directly from your desktop to your blog (at least for my WordPress.com blog).

Previously, I drafted my blog posts in LibreOffice Writer (open source equivalent of Microsoft Office) and even add links using handcoded HTML. (My work requires me to add HTML by hand so I’ve very familiar with it.)

Windows Live Writer makes it easier to add text formatting, photos, links and a lot more right from the comforts of the desktop.

What I don’t like about the software is that the Insert Picture function shrinks the photo to a tiny size so I have to manually upload it on WordPress.

Head over to Microsoft to download Windows Live Writer.

No. 2: Dropbox

Something like Dropbox. Credit: Dropbox

The second on my list is Dropbox. I usually blog on three computers: home PC, office laptop and a netbook when travelling. It’s hard to get everything synchronized without Dropbox.

I save only one copy of my file in Dropbox, but I can retrieve the most recently updated file through the system. Isn’t it like magic?

I’ve installed Dropbox on all three computers and my iPhone. I don’t use it just for travel blogging. I also upload my photos from my phone to it as backup but recently, I’ve began using Google+ as photo backup because of the almost unlimited space.

Head over to download Dropbox for your computer.

No. 3: Picasa

Creating a collage in Picasa

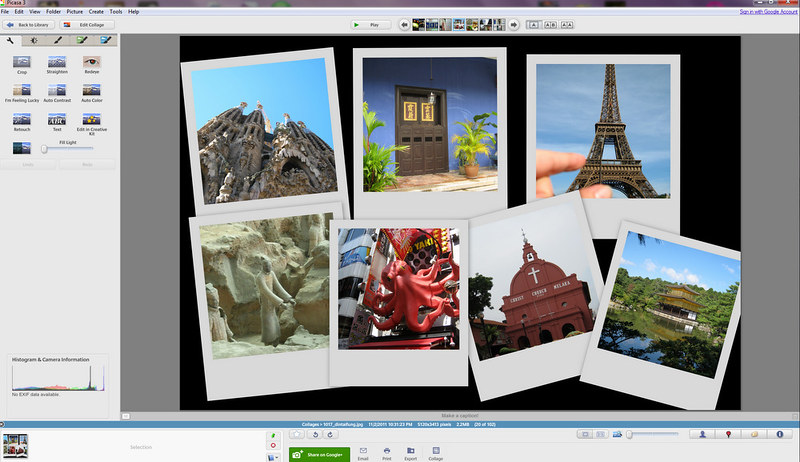
Photos are important as part of the narrative for travel blogging. (Although some take that to the extreme.)

I don’t have Photoshop as I don’t know how to use it (and too cheap to buy it). Instead, I have Picasa which I use to organize my photos as well as crop and resize for images I want to put on the site.

The best feature of this tool is the “Export”, which resizes photos to the pixel length you specify. I find that 1000 pixel makes a good image size.

My free WordPress.com account does not have unlimited storage for images so I am careful to resize photos before putting them up. Exporting the photos also cut down on the size.

By the way, Picasa is owned by Google so you can easily upload your photos to Google Drive from the software.

Download Picasa.

No. 4: Evernote

Ever bookmarked a bunch of cool links and end up forgetting where the bookmarks are or feel too tired to sort through all the content? I did.

That was until I used Evernote. //end of commercial

Just kidding.

I began using Evernote after reading about a couple who were travelling the world without a guidebook.

I use the software and its Chrome widget to “clip” interesting content on the Web. For example, when I was writing my first guest post about Kuching. I “clipped” a few relevant pages from the Internet for reference.

It’s also very useful for travel planning since you have all the pages gathered in an area.

Download Evernote

No. 5: WordPress.com

travel blogging tools
Old school YQ Travelling format

I almost forgot about WordPress.com which is ironic because my blog would not exist without it.

The first post in this blog was written in Xanga because my friend was using it. The mass photo upload function knocked my socks off. Since then, I have cold feet for most activities.

Then I shifted the blog to Posterous because it’s a cute microblog site. Later I found out that the functionality is too limited so I ported it to WordPress.com.

Some people were telling me that I should have started the self-hosted version of WordPress instead. If you, like me, do not know what that means, you can just ignore that sentence.

Perhaps one day I might switch to WordPress.org, but that day is still not here yet.

Extra: LibreOffice Writer

LibreOffice Writer was in my original list of Top 5 but was kicked off the list when I discovered Windows Live Writer.

Instead of writing directly on my WordPress blog, I prefer having my draft on my computer because I can “Undo” more in here.

LibreOffice Writer looks a lot like Microsoft Word. It’s an open source word processing tool. You can write in it like Microsoft Word but you don’t need to pay Microsoft.

I started out using OpenOffice (LibreOffice’s past life) out of spite of Mircosoft. Then I got hooked to it. It feels a lot better than Word, although my boss would say that the Spellcheck is not working as well as Word.

I also use LibreOffice’s version of Excel for budgeting.

So, those are my favorite tools for travel blogging. What are your essential digital tools for travel blogging? Share it in the comments.

Help! I am addicted to Pocket Planes (plus some tips)

While I do review travel-planing apps (erm.. Flight Lover only for now) here, today’s app is slightly different but still travel-related.

I started playing Pocket Planes last Friday. It’s created Nimblebit which also made Tiny Tower. This explains why I could not stop checking my phone and tapping the screen like a zombie.

The game is not as simple. Picking it up was frustrating since I did not know what I was supposed to do.

You need to fly passengers and cargo to different destinations on the map. First, you choose a country. I picked Japan because I love the Land of the Rising Sun. (Interestingly, my colleagues all chose Japan too, not sure why.)

Tip 0: Pick a region that you are familiar with
->I chose Japan because I know the country quite well. Plus, the locations aren’t very far from each other.

Then you start flying cargo or folks across the country, earning bitcoins and bux along the way.

Why is it addictive? Like Tiny Tower, there’s a waiting element then reward. Then there’s the panicking part where I fear that I am not earning all the bitcoins I can while I am awake.

Addictions happen silently.

The bitbook is totally cute too. And it has not reached the stage where I’ve read every single entry and its variation.

Some Pocket Planes tips

anWith all that playing, I’ve figured out some strategies that work for me. But since I’ve been playing for a while, I’m not sure which tip is for beginning player and which for more advanced player as reference.

For example, I assume you know that bux (the

Tip 1: Give good names

One important trick in the game is combos (explained in Tip 2), so I name my planes based on their functionality.

A plane that flies 1 passenger and 1 cargo is called 1P1C.
A plane that flies no passenger and 2 cargo is called 0P2C.

Tip 2: C-c-c-combo!

In case you are not joined at the hip to the Internet like I am, it’s supposed to be c-c-c-combo breaker.

Combos work like dream jobs in Tiny Tower. You earn an extra 25 percent if your cargo/passengers are heading to the same location and you fly them there.

Tip 3: Build planes with multiple seats, cargo area.
Do not buy fully-made planes! I was stupid enough to do that. Related to Tip 2, you should save your bux to buy parts of planes with multiple seats/cargo area.

For more advanced players, planes have different classes and some airports don’t take classes higher than theirs. Example, only Osaka, Tokyo and Seoul are able to receive Class 2 planes.

Tip 4: Don’t bother with small airports
Once I saved up enough bux, I started buying airports. Unfortunately, an airport like Vladivostok with a population of 0.6M means my planes are stuck there with nothing to send.

I usually end up flying with an empty plane from Vladivostok to busier airports. I had to close down Vladivostok, wasting my upgrades and airport buying fee.

Now that I have the three major hubs, Osaka, Tokyo and Seoul, my planes fly almost none stop between them.

Tip 5: Layover’s your other best friend

A combo flight is the best but you can’t get one most of the time. I would fly a plane with passengers or cargo that have different destinations and stop at the nearest. (You get the same money no matter how heavy your cargo is.)

At the new airport, I would offload my cargo so that other planes can have combos, or pick up cargo to turn my flight into a combo flight.

Does that make sense?

Tip 6: Eliminate weak planes
When you have enough bux, buy multi function planes and retire single function aircrafts (eg 0P1C, 1P0C).

Since airplane slots cost bitcoins, it’s better to remove not useful planes to the hanger than fly one watermelon across the country.

Tip 7: Bring a charger
This is probably the most important tip for me. I cannot put it down and it’s draining my battery. ;)

Fly me to the end of the earth, captain!

Are you playing Pocket Planes? Can you share your tips?

Mobile app review: FlightLover

FlightLover is an Apple iOS app that checks for cheap air tickets of budget airlines. It’s available for different countries of origin–Singapore, Malaysia, Indonesia, Thailand, Vietnam, Philippines, Hong Kong, Taiwan.

There’s one thing you need to know about me. I am very stingy and it is very rare that I will pay for an app unless it is really useful.

I downloaded the app a long long time ago, hoping it would help me score cheap flights. Unfortunately, I haven’t bought any cheap flights using the app but I do have other purposes for it.

I use it mainly to check how low flights can go. I also use it to help friends double check if there are cheap flights around the period they want to travel.

The app will be useful for the casual bargain air ticket hunter (I’m among a semi-hardcore bargain hunter while a friend of mine is Level-999 in cheap airticket hunting.)

How it’s like

When you open the app, it gives a list of the destinations in its database as well as the cheapest flights. I love how the cover photos are changed from time to time, for example, the highlighted destination today is Sydney.

For this demo, I chose Kuala Lumpur as my destination as it’s one of the cheapest destinations.

I’m able to slide the slider (duh) to indicate how many days I want to travel. Please note that it includes the day you fly. For example, if a flight leaves the airport at 11pm, it counts as a day.

The return time is actually the hour you return to your country of origin. That is helpful for those who don’t want to guess when they reach home. For me, I would prefer the timing of the flight back instead so I can see how many hours I can still have fun.

You can also select the date range you want which is helpful to zoom in the long weekend dates. The little red triangle on the upper right of the price shows that the trip involves a weekend–super!

After you’ve selected the best price, head into the date and it’ll show you the details of the flight as well as the checkin time (so considerate of them!)

The “Book” button only helps you call the airline while the “Share with friends” lets you tweet/Facebook/e-mail others about the cheap price.


The app also has a neat “Beep” mode which will alert you of deals that have dropped below the price you’ve indicated.

Everyday, around 9am, it will deliver a message alert if the tickets have fallen below the price you like.

Even thought I’ve switched this function on, I always feel annoyed when it reminds me of a cheap flight because I can’t go on a holiday now


The design of the interface is really clean and beautiful. There is an airplane flying in circles when it loads a page. A sad emoticon appears when there is no connection.

The companion Web site has the same functionality but with limited travel dates. The app can be found on the App Store.

Ratings

“Borrowing”148apps.com’s review format:

FlightLover Singapore
Developer: Handstand (The folks who brought you gothere.sg)
Price: S$2.99
Version Reviewed: 1.27
Device Reviewed On: iPhone 4
iPhone Integration Rating: 3 out of 5 stars (Not integrated into Twitter–iOS 5 functionality)
User Interface Rating: 4 out of 5
Re-use Value Rating: 5 out of 5

Overall Rating: 4 out of 5

Why you should get TripIt

tripit

I went to cover a tech event today and the main theme was about the personal cloud and how it would become the center of our digital lives.

It got me thinking about my personal cloud apps and how it allowed me to be free of a USB and forwarding all documents to my e-mail.

I have many cloud apps I love but for travelling, I adore TripIt (and Google Docs’ Speadsheet).

I wrote a semi-review of TripIt last September on my now-dead tech blog. Since then, I’ve used the app for many more months and have grown really fond of it. I basically use it as my carrot–whip out my phone, see my upcoming trips before getting back to real life.

If you haven’t tried out TripIt, I’m here to convince you to do so. The light version is free anyway! I don’t have much use for the Pro version’s extra functionalities.
Continue reading “Why you should get TripIt”